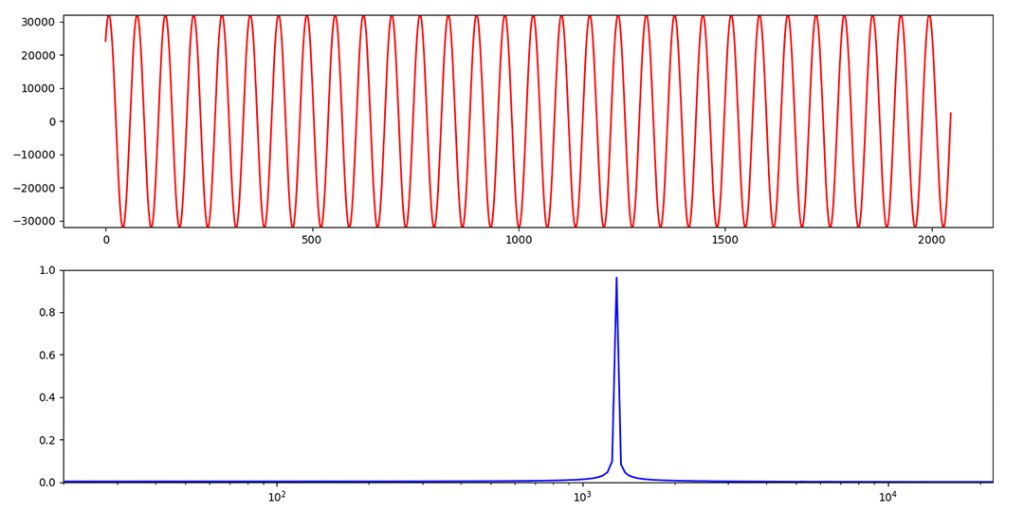
Since we have already built spectrum analyser in part 1, where we use the PyAudio Python library to open the microphone and bring in raw binary data into the code. Convert that binary data into 16-bit integers and displayed
them on a Plot using the MatPlotLib’s PyPlot.
If you have not built it in the part one, click here and build the part 1 as
this part will be a continuation to that.
The algorithm to calculate the Spectrum
We will be using the FFT or the Fast Fourier Transform to calculate spectrum for the spectrum analyser. Now, FFT is an algorithm that computes the Discrete Fourier Transform. In short
the DFT of a sequence of signal to represent it in frequency domain.
There are many different FFT algorithms based on a wide range of published theories, from simple complex-number arithmetic to group theory and number theory. The one we will be using is the python fft algorithm from the library Numpy.
Package 📦 to import for fft in Python?
As far as the the part of the code which calculates the FFT of a sequence, there are many libraries that offer simple classes to do so. Since we already imported Numpy. And since it already provides the class or method to calculate the FFT. We will not be importing any new library.
Also, take a note that there are other libraries available that compute the FFT of a sequence of signal.
The code for audio spectrum analyser / audio visualizer
Since we have already coded in the first part, we will only be making a few changes to the code, a few additions and then we will be good to go. If you don’t have the code get it from here.
Now in the part where we initiallise the plot objects, that is to say the figure and the axises, make the following changes.
Instead of
fig, ax = plt.subplots()make it
fig, (ax,ax1) = plt.subplots(2)and add the following lines, to the code. The first line creates a one dimentional array containing the values from 0 uptill 44100 with number of parts equal to the size of CHUNK. And the next line sets the X axis as semilog since the frequency representation is always done on semilog plots.
x_fft = np.linspace(0, RATE, CHUNK)
line_fft, = ax1.semilogx(x_fft, np.random.rand(CHUNK), 'b')
Since the output of the FFT computations are going to range from 0 to 1. We change the Y limits of the frequency plot. And also, since the computation produces a mirror of the spectrum after half the sampling rate. We dont need the part after half the sampling rate, that is after 22050. And hence we change the X limit also.
ax1.set_xlim(20,RATE/2)
ax1.set_ylim(0,1)
And then in the infinite loop, add the following lines to compute the FFT and plot it.
Since the computed FFT contains both the real and the imaginary part. We take the absolute value of the returned FFT spectrum,
multiply it by 2, and then divide it by 33000 times CHUNK to produce a plot with Y values ranging from 0 to 1.
line_fft.set_ydata(np.abs(np.fft.fft(dataInt))*2/(33000*CHUNK))The Complete code
import numpy as np #importing Numpy with an alias np
import pyaudio as pa
import struct
import matplotlib.pyplot as plt

CHUNK = 1024 * 1
FORMAT = pa.paInt16
CHANNELS = 1
RATE = 44100 # in Hz

p = pa.PyAudio()

stream = p.open(
    format = FORMAT,
    channels = CHANNELS,
    rate = RATE,
    input=True,
    output=True,
    frames_per_buffer=CHUNK
)


fig, (ax,ax1) = plt.subplots(2)
x_fft = np.linspace(0, RATE, CHUNK)
x = np.arange(0,2*CHUNK,2)
line, = ax.plot(x, np.random.rand(CHUNK),'r')
line_fft, = ax1.semilogx(x_fft, np.random.rand(CHUNK), 'b')
ax.set_ylim(-32000,32000)
ax.ser_xlim = (0,CHUNK)
ax1.set_xlim(20,RATE/2)
ax1.set_ylim(0,1)
fig.show()

while 1:
    data = stream.read(CHUNK)
    dataInt = struct.unpack(str(CHUNK) + 'h', data)
    line.set_ydata(dataInt)
    line_fft.set_ydata(np.abs(np.fft.fft(dataInt))*2/(11000*CHUNK))
    fig.canvas.draw()
    fig.canvas.flush_events()
Then, when you run the program, you should be able to see the time domain as well as the frequency domain representation of the sequence from the microphone.

You shoud be able to get plots similar to one given above. Use this website to generate pure sine/square/triangular waves with any frequency you want to test out this project.
Liked the project? Drop your reviews in the comment section, and share it among your fellow mates. 👍🏻
Check out my other posts.
Follow
me on Social Media 👇👇👇

